Configure IAM Identity Center as SAML for external AWS account
- Overview
- Benefits of AWS IAM Identity Center
- Step 1: Configure the AWS IAM Identity Center
- Step 2: Add an external AWS account as an application
- Step 3: Create a SAML Identity Provider in external AWS account
- Step 4: Configure access details of the IAM role in the Identity Center
- Step 5: Assign users or user groups to the application
- Step 6: Verify
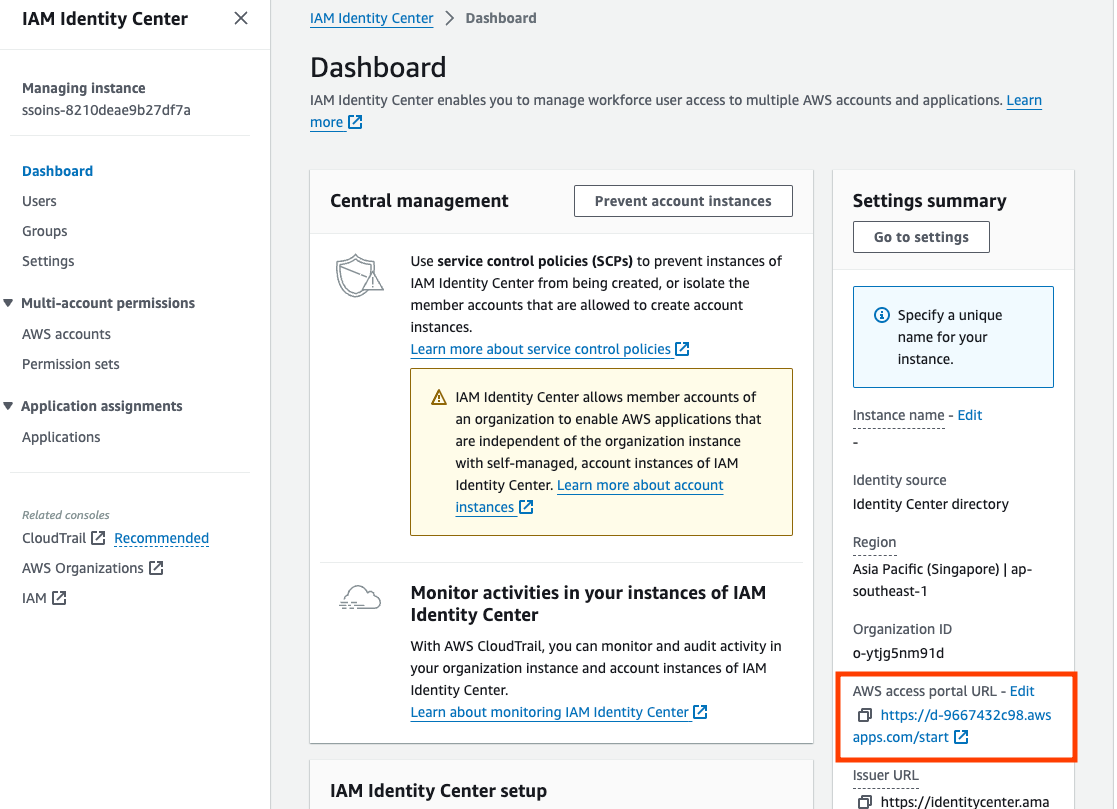
- Access keys from the SSO
- Gets the IAM Role ARN to be used in EKS aws-auth
Overview
This document provides a step-by-step guide to configure AWS IAM Identity Center (formerly known as AWS Single Sign-On) within AWS Organization A to serve as a SAMLv2 Identity Provider. This configuration will allow the operations team to log into external AWS accounts using cross-account IAM roles, simplifying access management across different environments.
By setting up SAML-based authentication through IAM Identity Center, you can centralize identity management, enhance security through fine-grained access controls, and streamline the user experience by enabling Single Sign-On (SSO) for users accessing external AWS accounts.
Benefits of AWS IAM Identity Center
AWS IAM Identity Center offers several benefits when managing cross-account access:
- Centralized Access Management: Streamlines user access to multiple AWS accounts by using one central location for managing identities and permissions.
- Enhanced Security: Reduces the risk of human error by eliminating the need for multiple IAM user credentials. Identity Center integrates with your existing corporate identity provider (IdP) and applies security best practices, such as enforcing Multi-Factor Authentication (MFA) and adhering to the principle of least privilege.
- Improved User Experience: Offers a seamless SSO experience for users, allowing them to access resources across AWS accounts without re-authenticating.
- Scalability: Easily manage access for hundreds of users across multiple accounts and applications through Identity Center’s user group-based management.
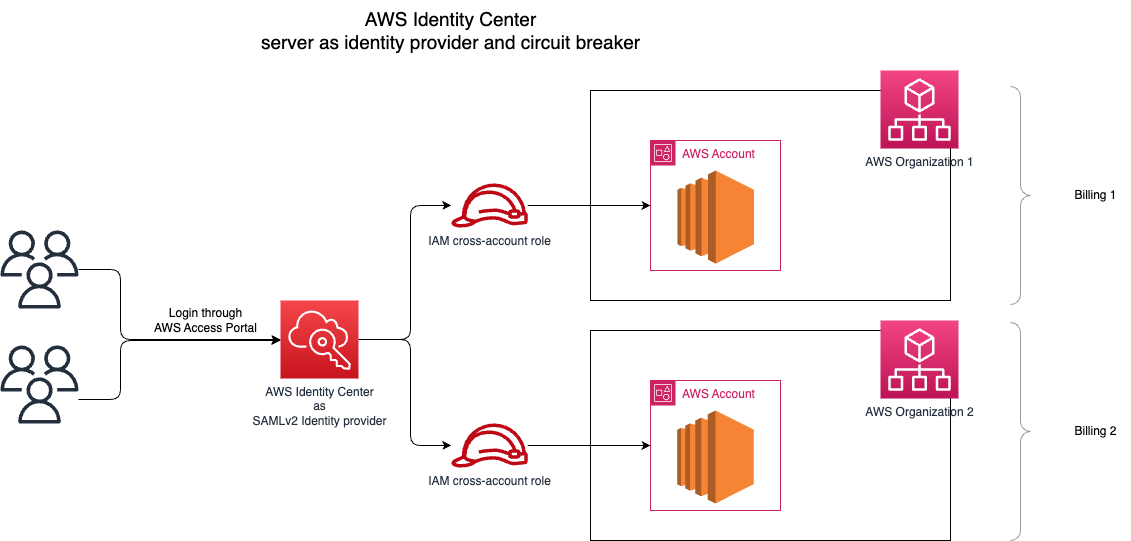
Step 1, 2, 4, and 5 are to be done in the AWS IAM Identity Center, while step 3 is to be done in the external AWS account.
Step 1: Configure the AWS IAM Identity Center
Description: In this step, you will enable AWS IAM Identity Center, set it up for your desired region, and configure it at the organization level. This setup is essential to allow users to access external AWS accounts through cross-account roles using SSO.
- Go to AWS IAM Identity Center
- Select the region where you want to set up the IAM Identity Center
- Select “Enable” to activate the service.
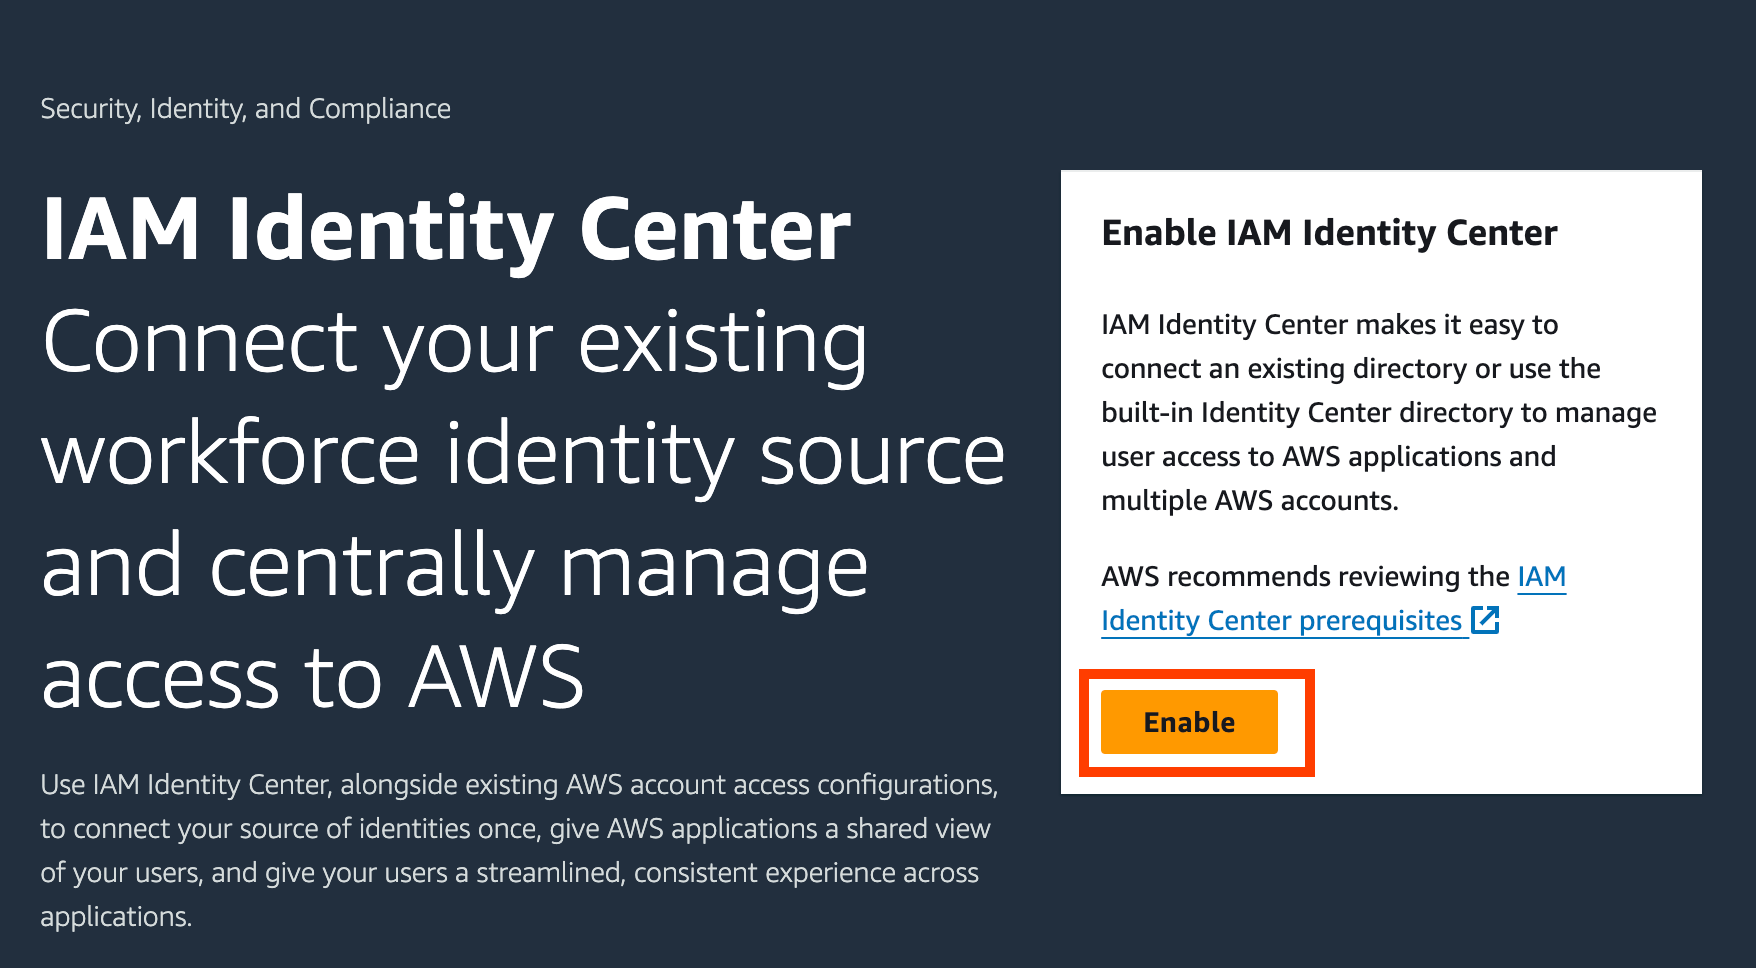
Note: For the selection of region, it is recommended to use the region of your workload, not a region that you might need to disable as according to AWS Regions Documentation.
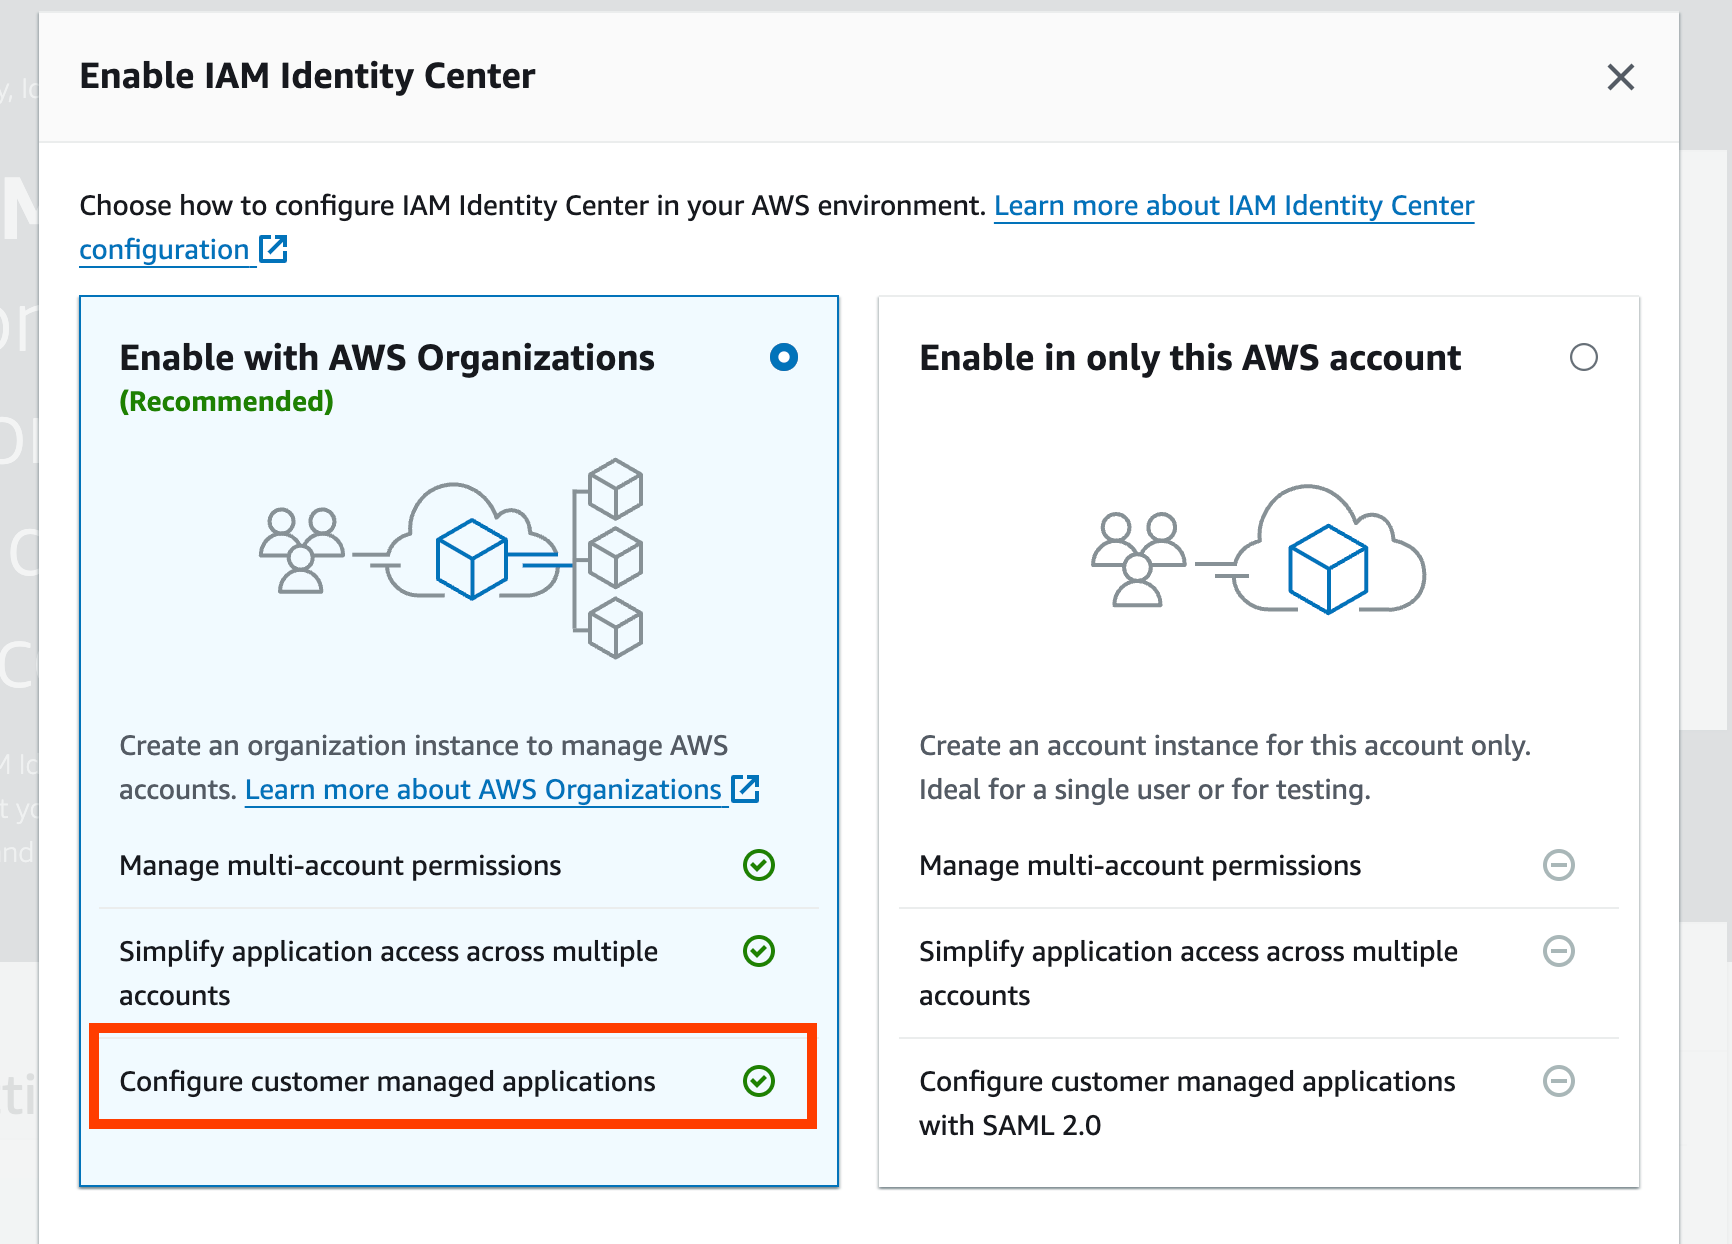
Because we will be adding an AWS account as a customer-managed application, we need to enable the Identity Center at AWS Organization level.
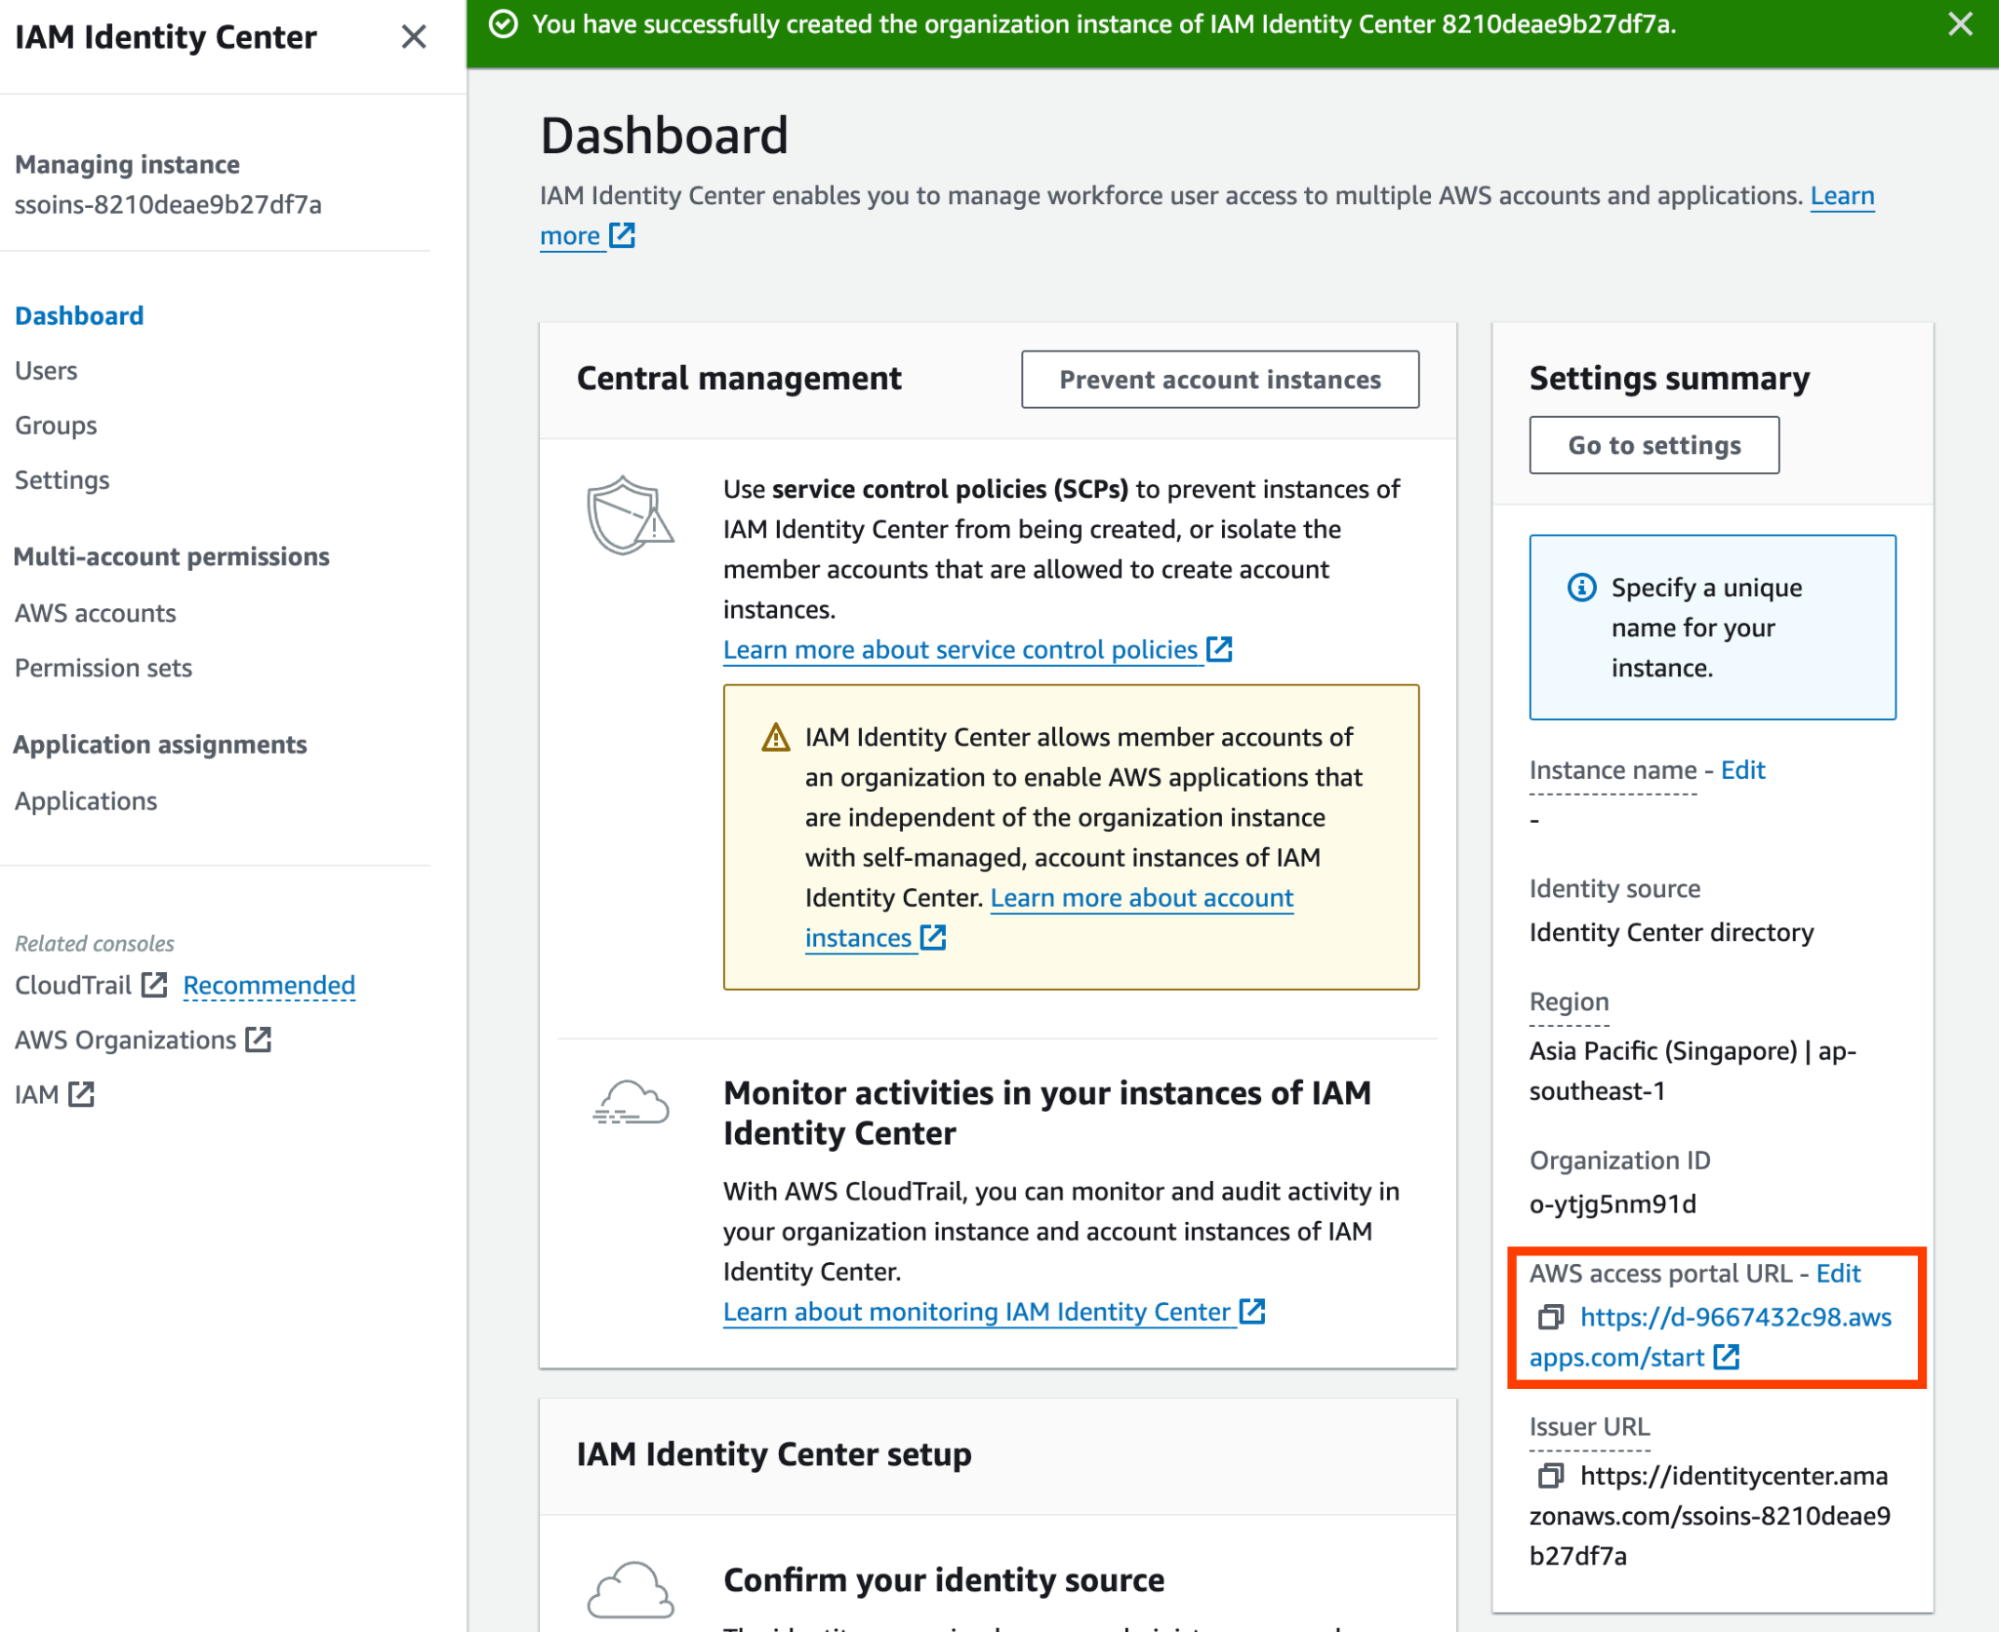
Once the Identity Center is created, you should be redirected to the dashboard.
Step 2: Add an external AWS account as an application
Description: In this step, you will configure IAM Identity Center to integrate with an external AWS account by setting it up as an application. This configuration allows the IAM Identity Center to manage user access to external AWS accounts using SAML authentication.
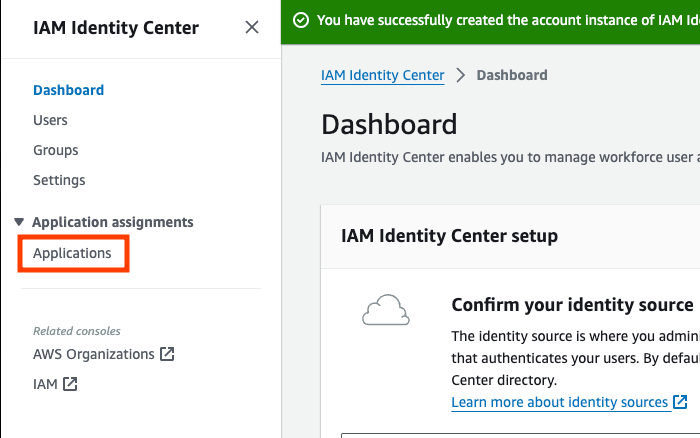
- From the Identity Center dashboard, select “Applications”.
- Select “Add application”.
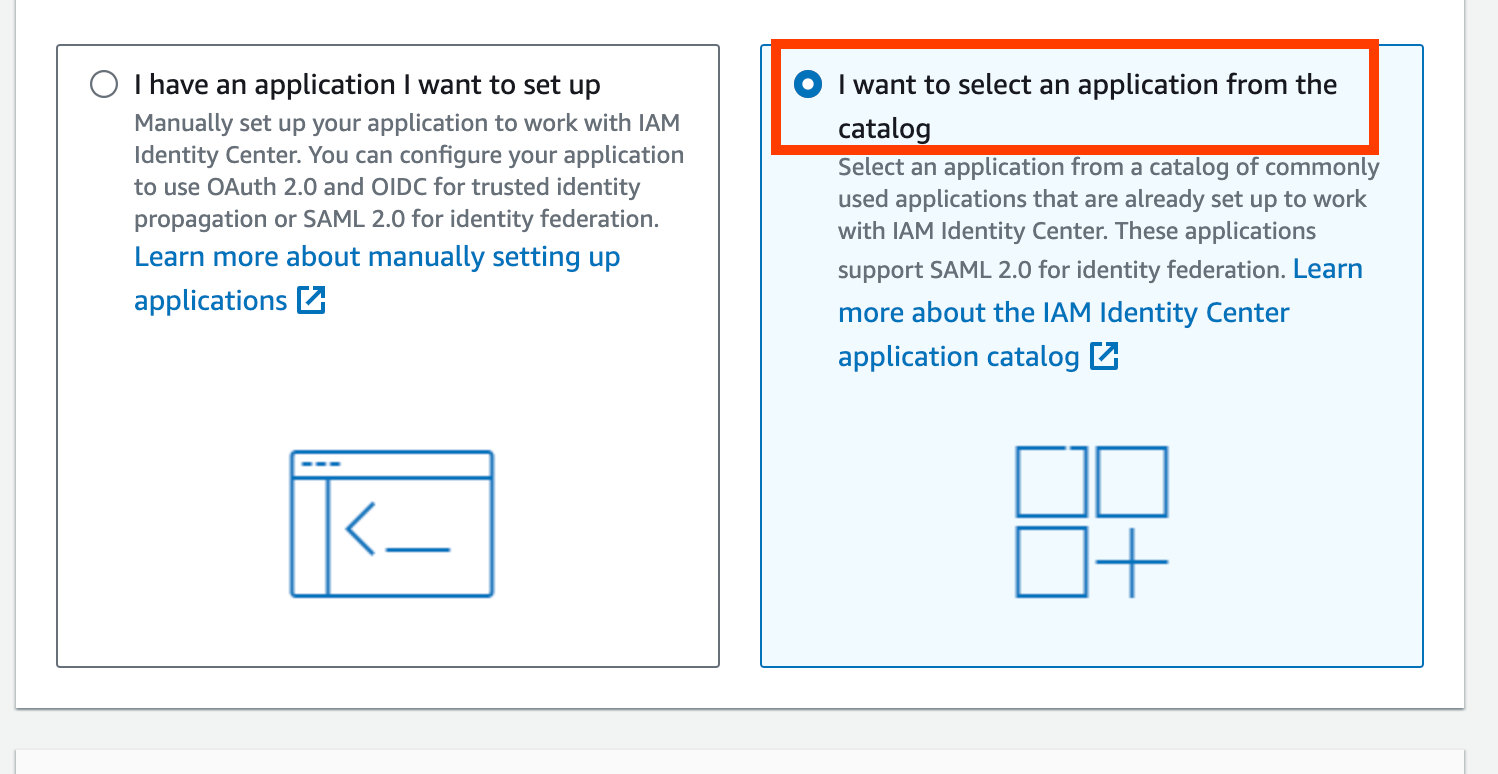
- Select “I want to select an application from the catalog”.
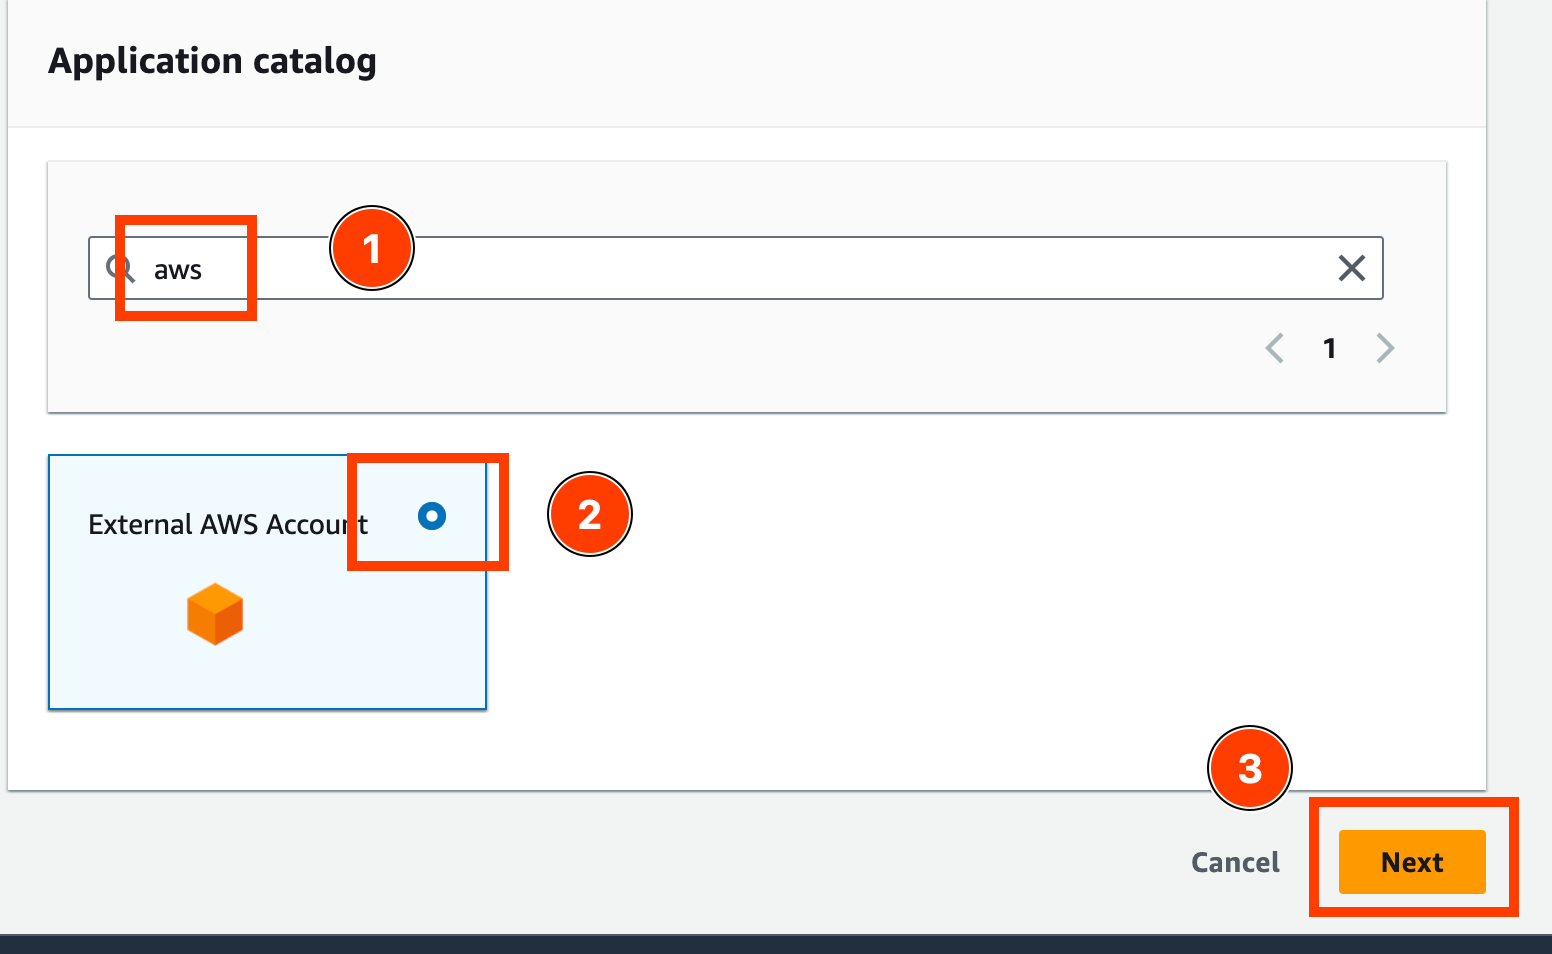
- Enter “aws” in the search of Application catalog, select “External AWS Account”, and select “Next”.
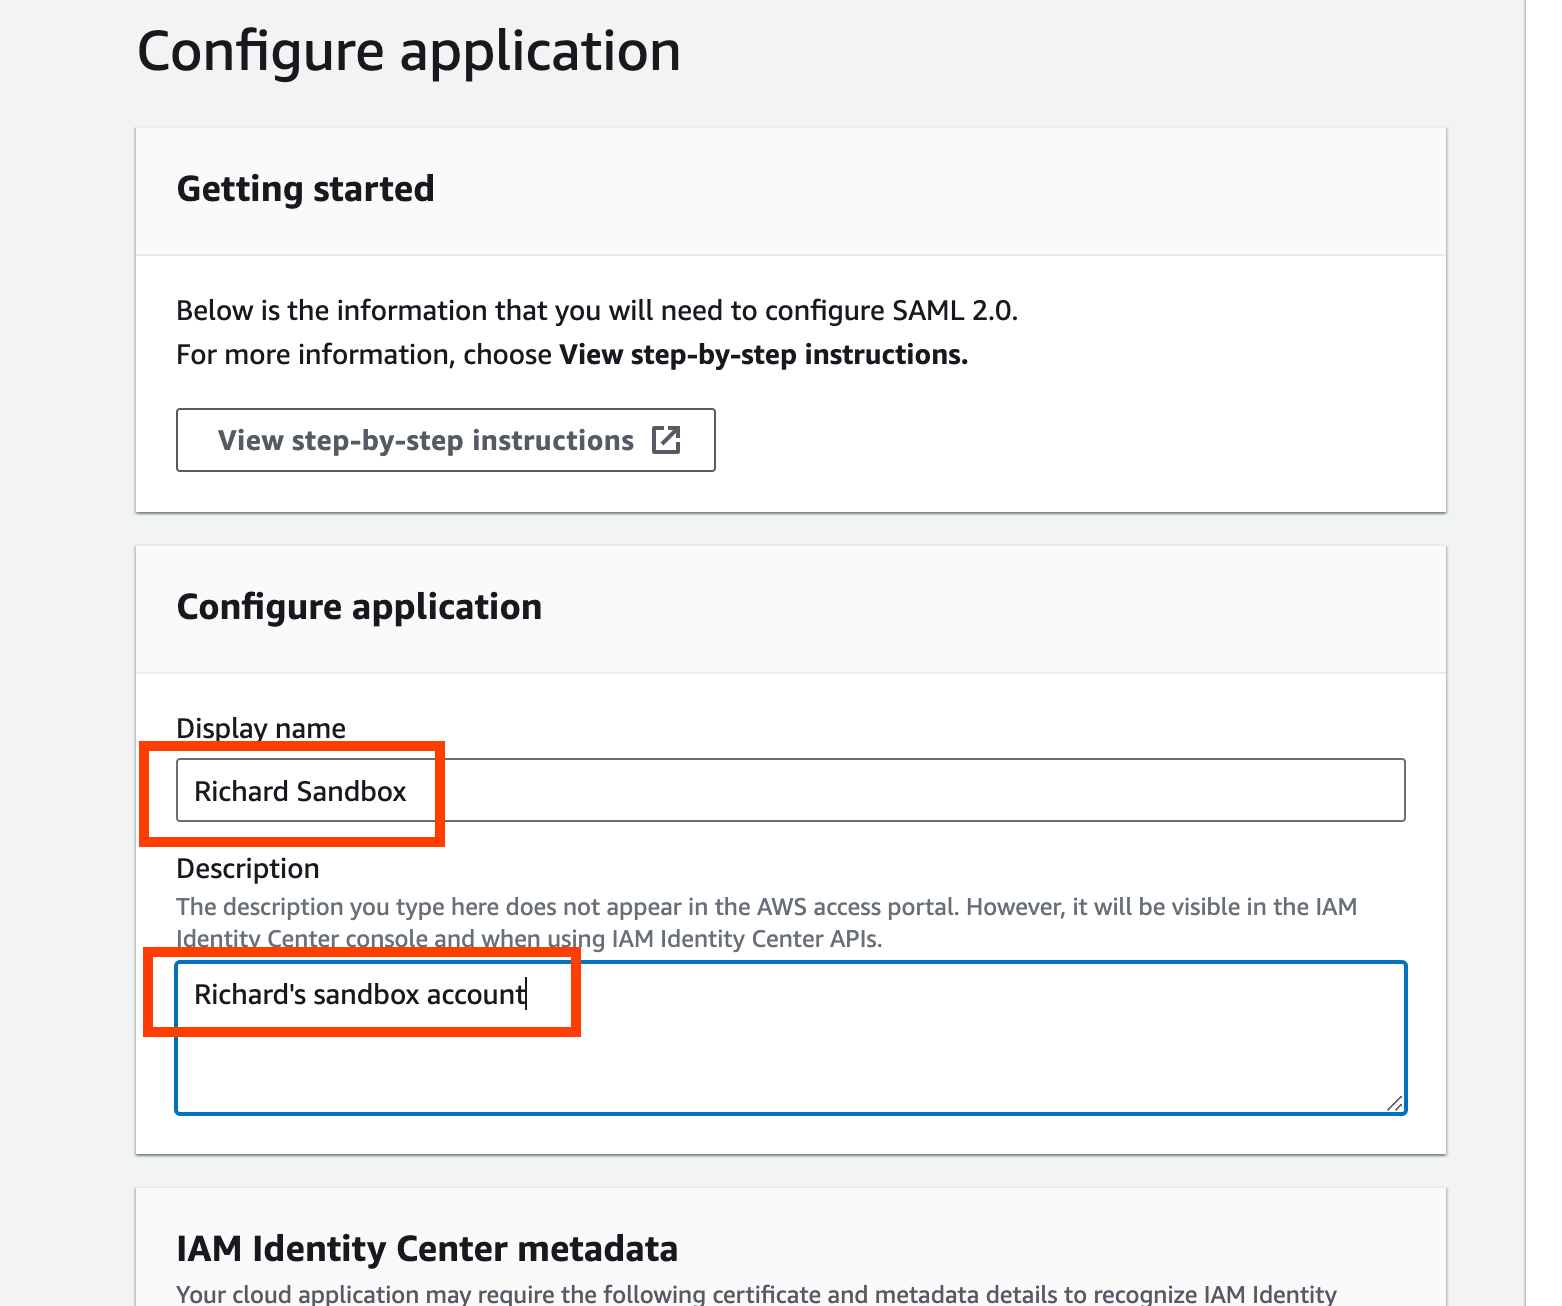
- In the “Configure application”, enter the intended Display name, and Description for the AWS account to be added:
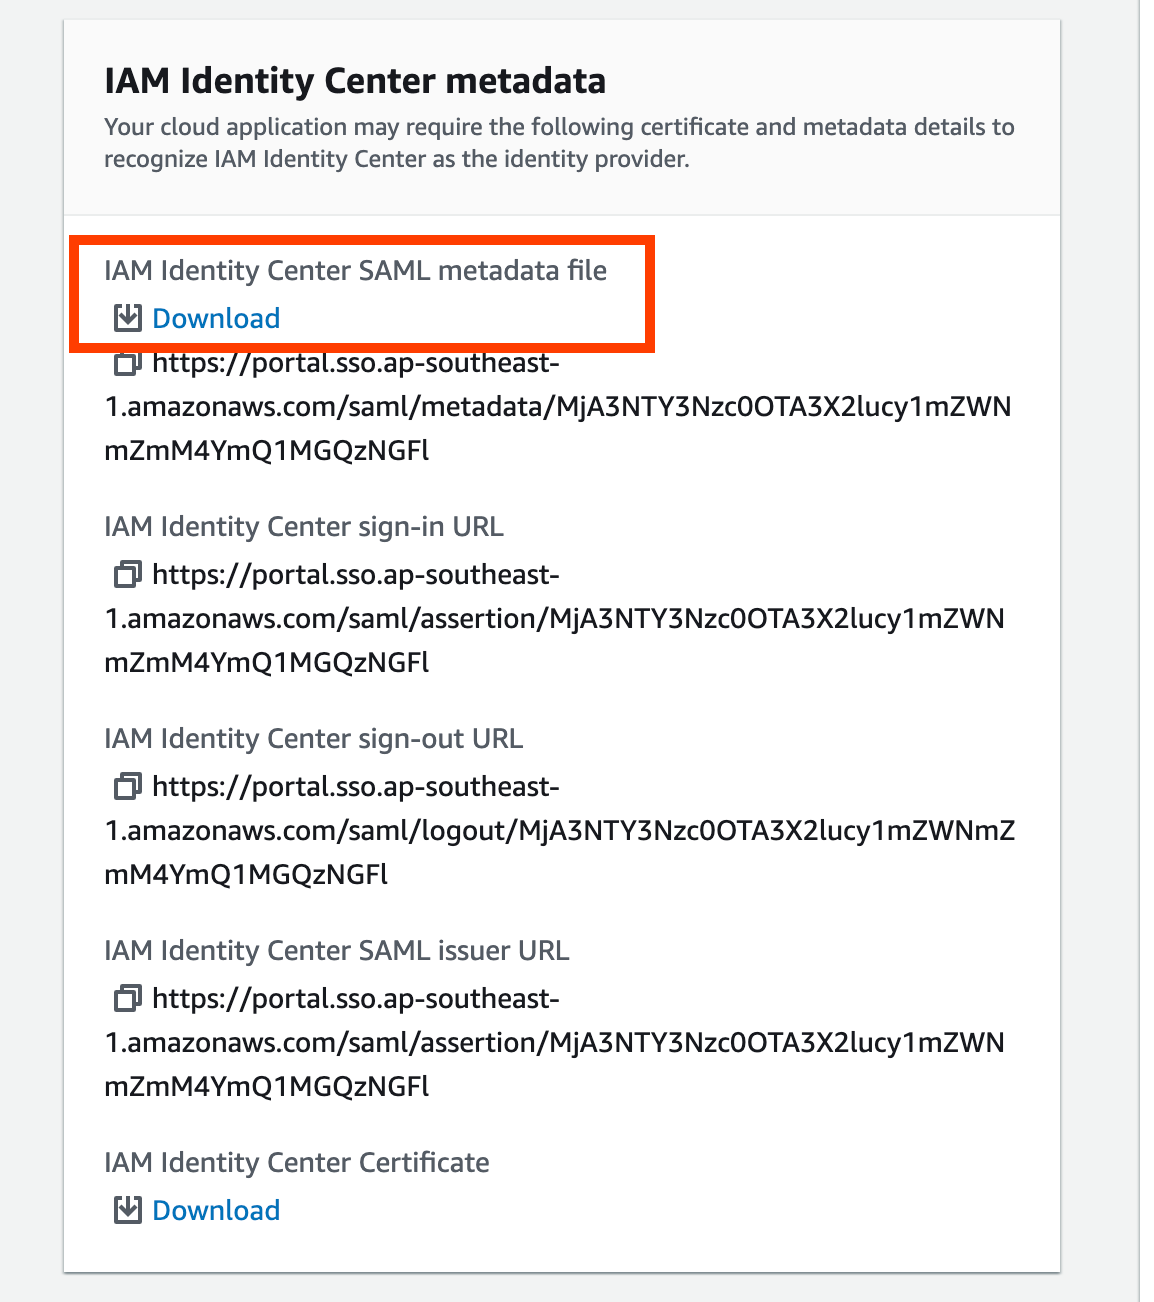
- Download the “IAM Identity Center SAML metadata file”, which will be needed when setting up the Identity provider in the External AWS account:
- Leave “Application properties” empty for now, accept all other parameters, and select “Submit”.

Step 3: Create a SAML Identity Provider in external AWS account
Description: This step focuses on configuring the external AWS account to trust the IAM Identity Center by setting up a SAML Identity Provider. This trust allows users to assume roles in the external AWS account securely.
- Login with administrator permission to the AWS account to be integrated.
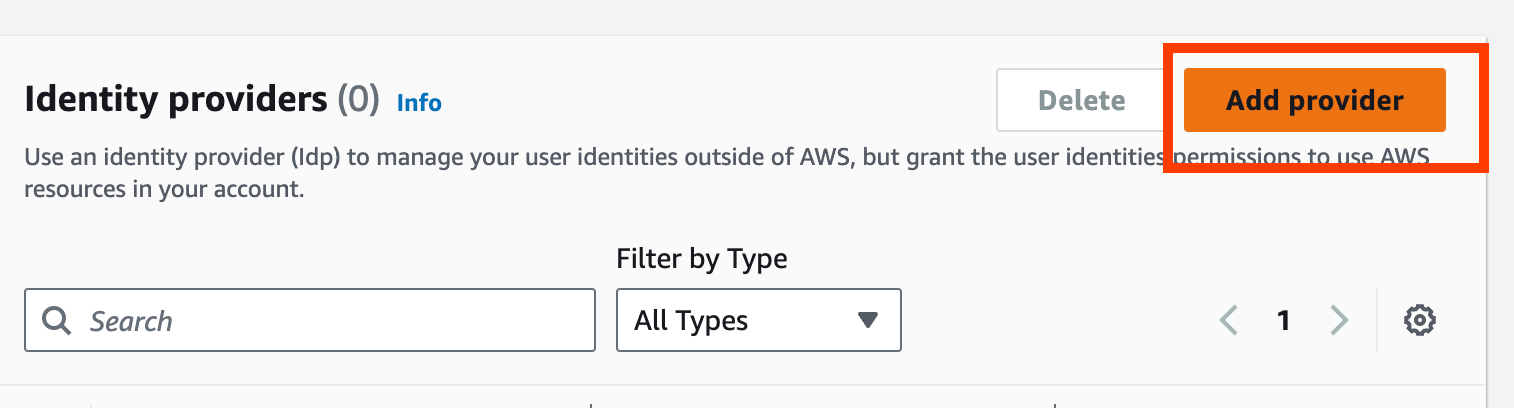
- Go to IAM Identity Providers at IAM Console.
-
Select “Add Provider”.
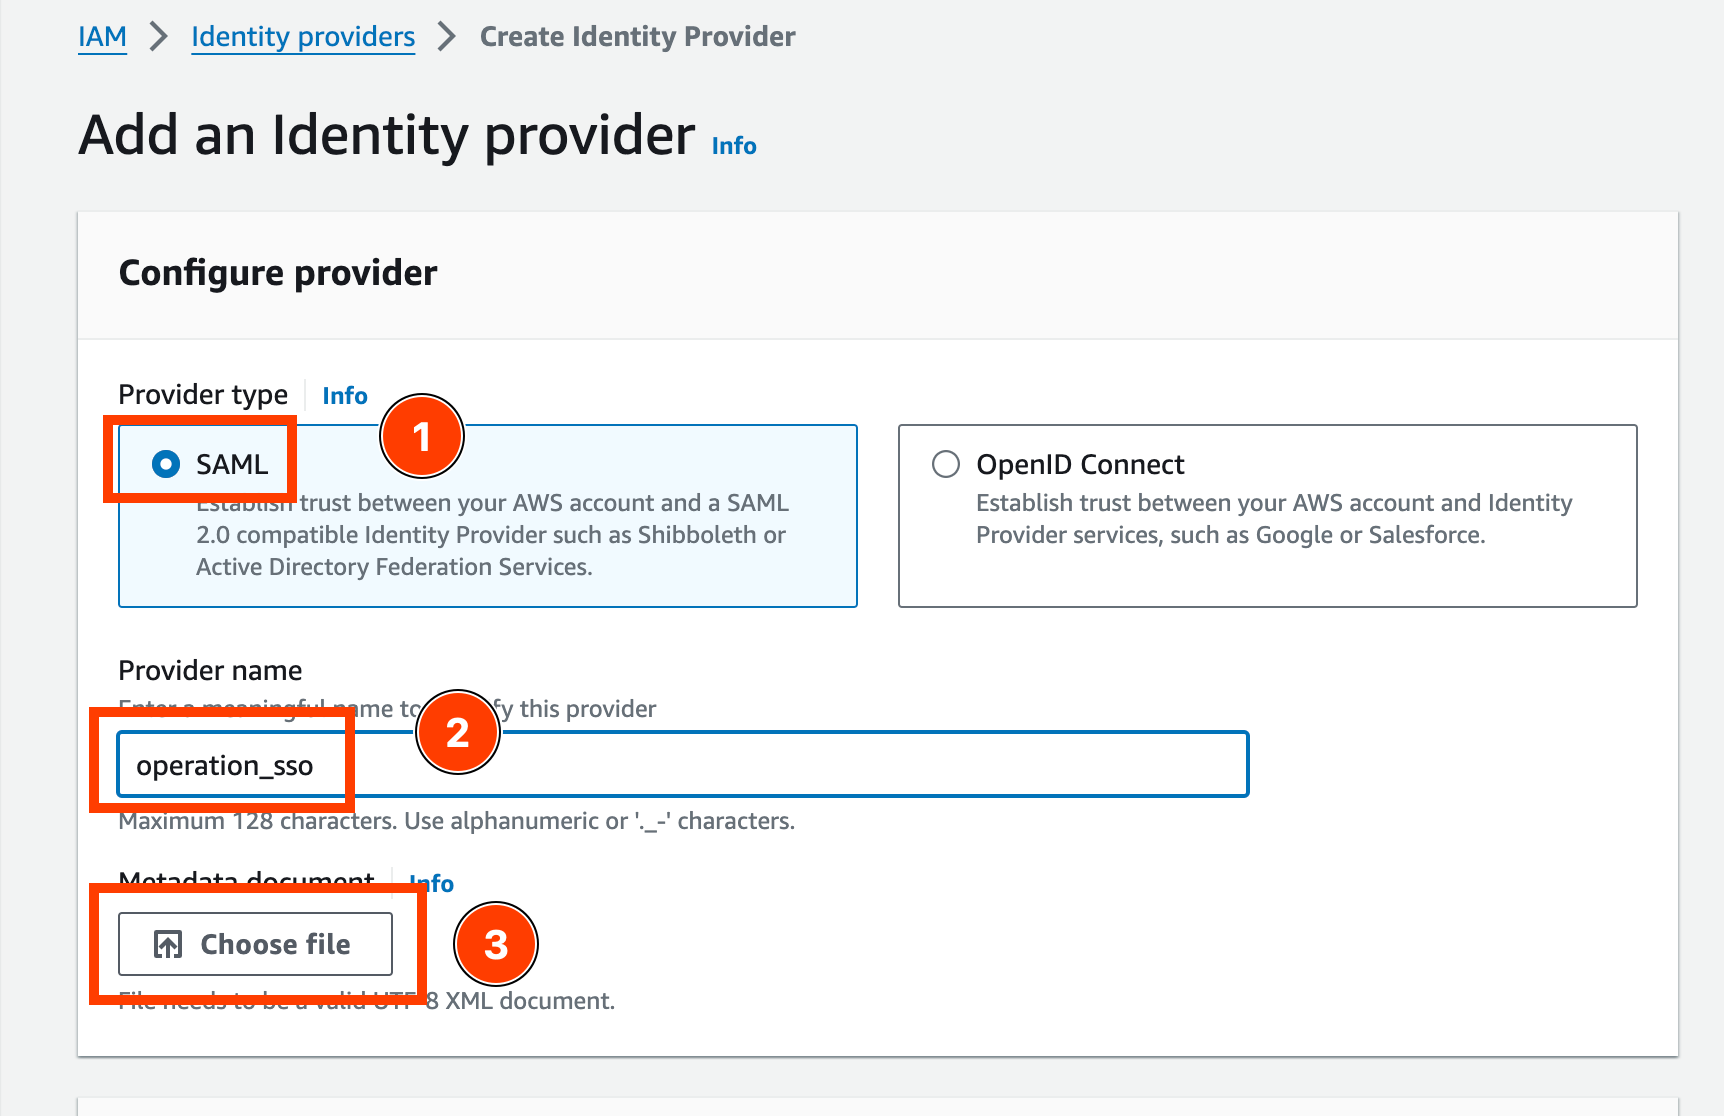
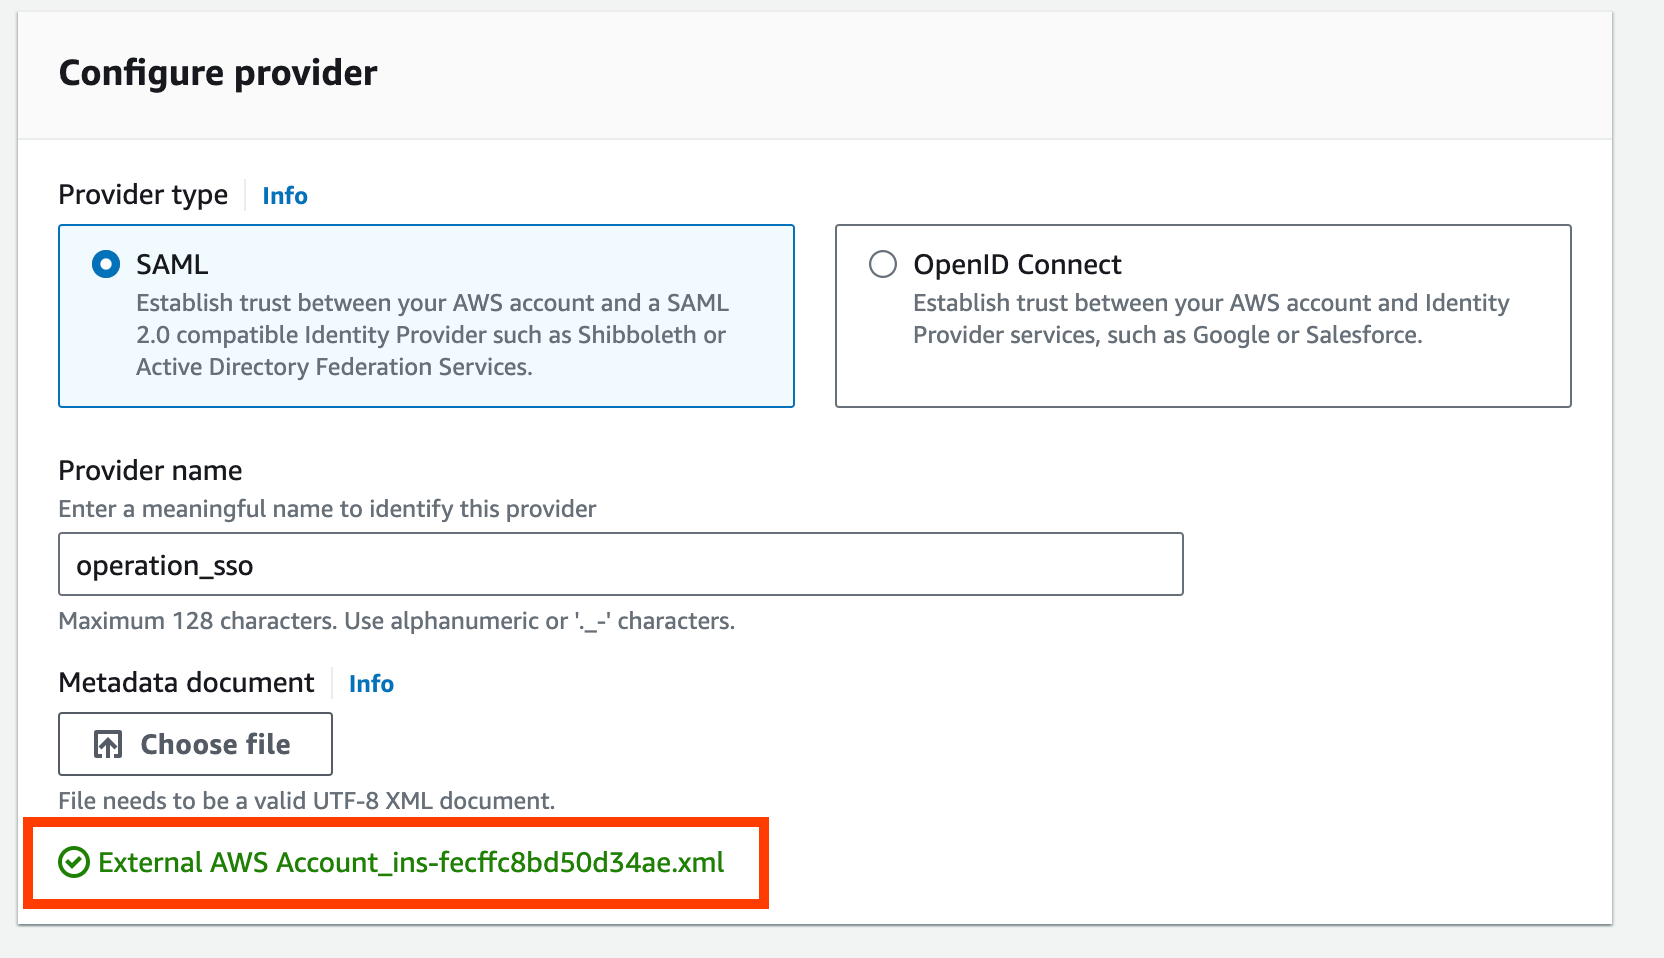
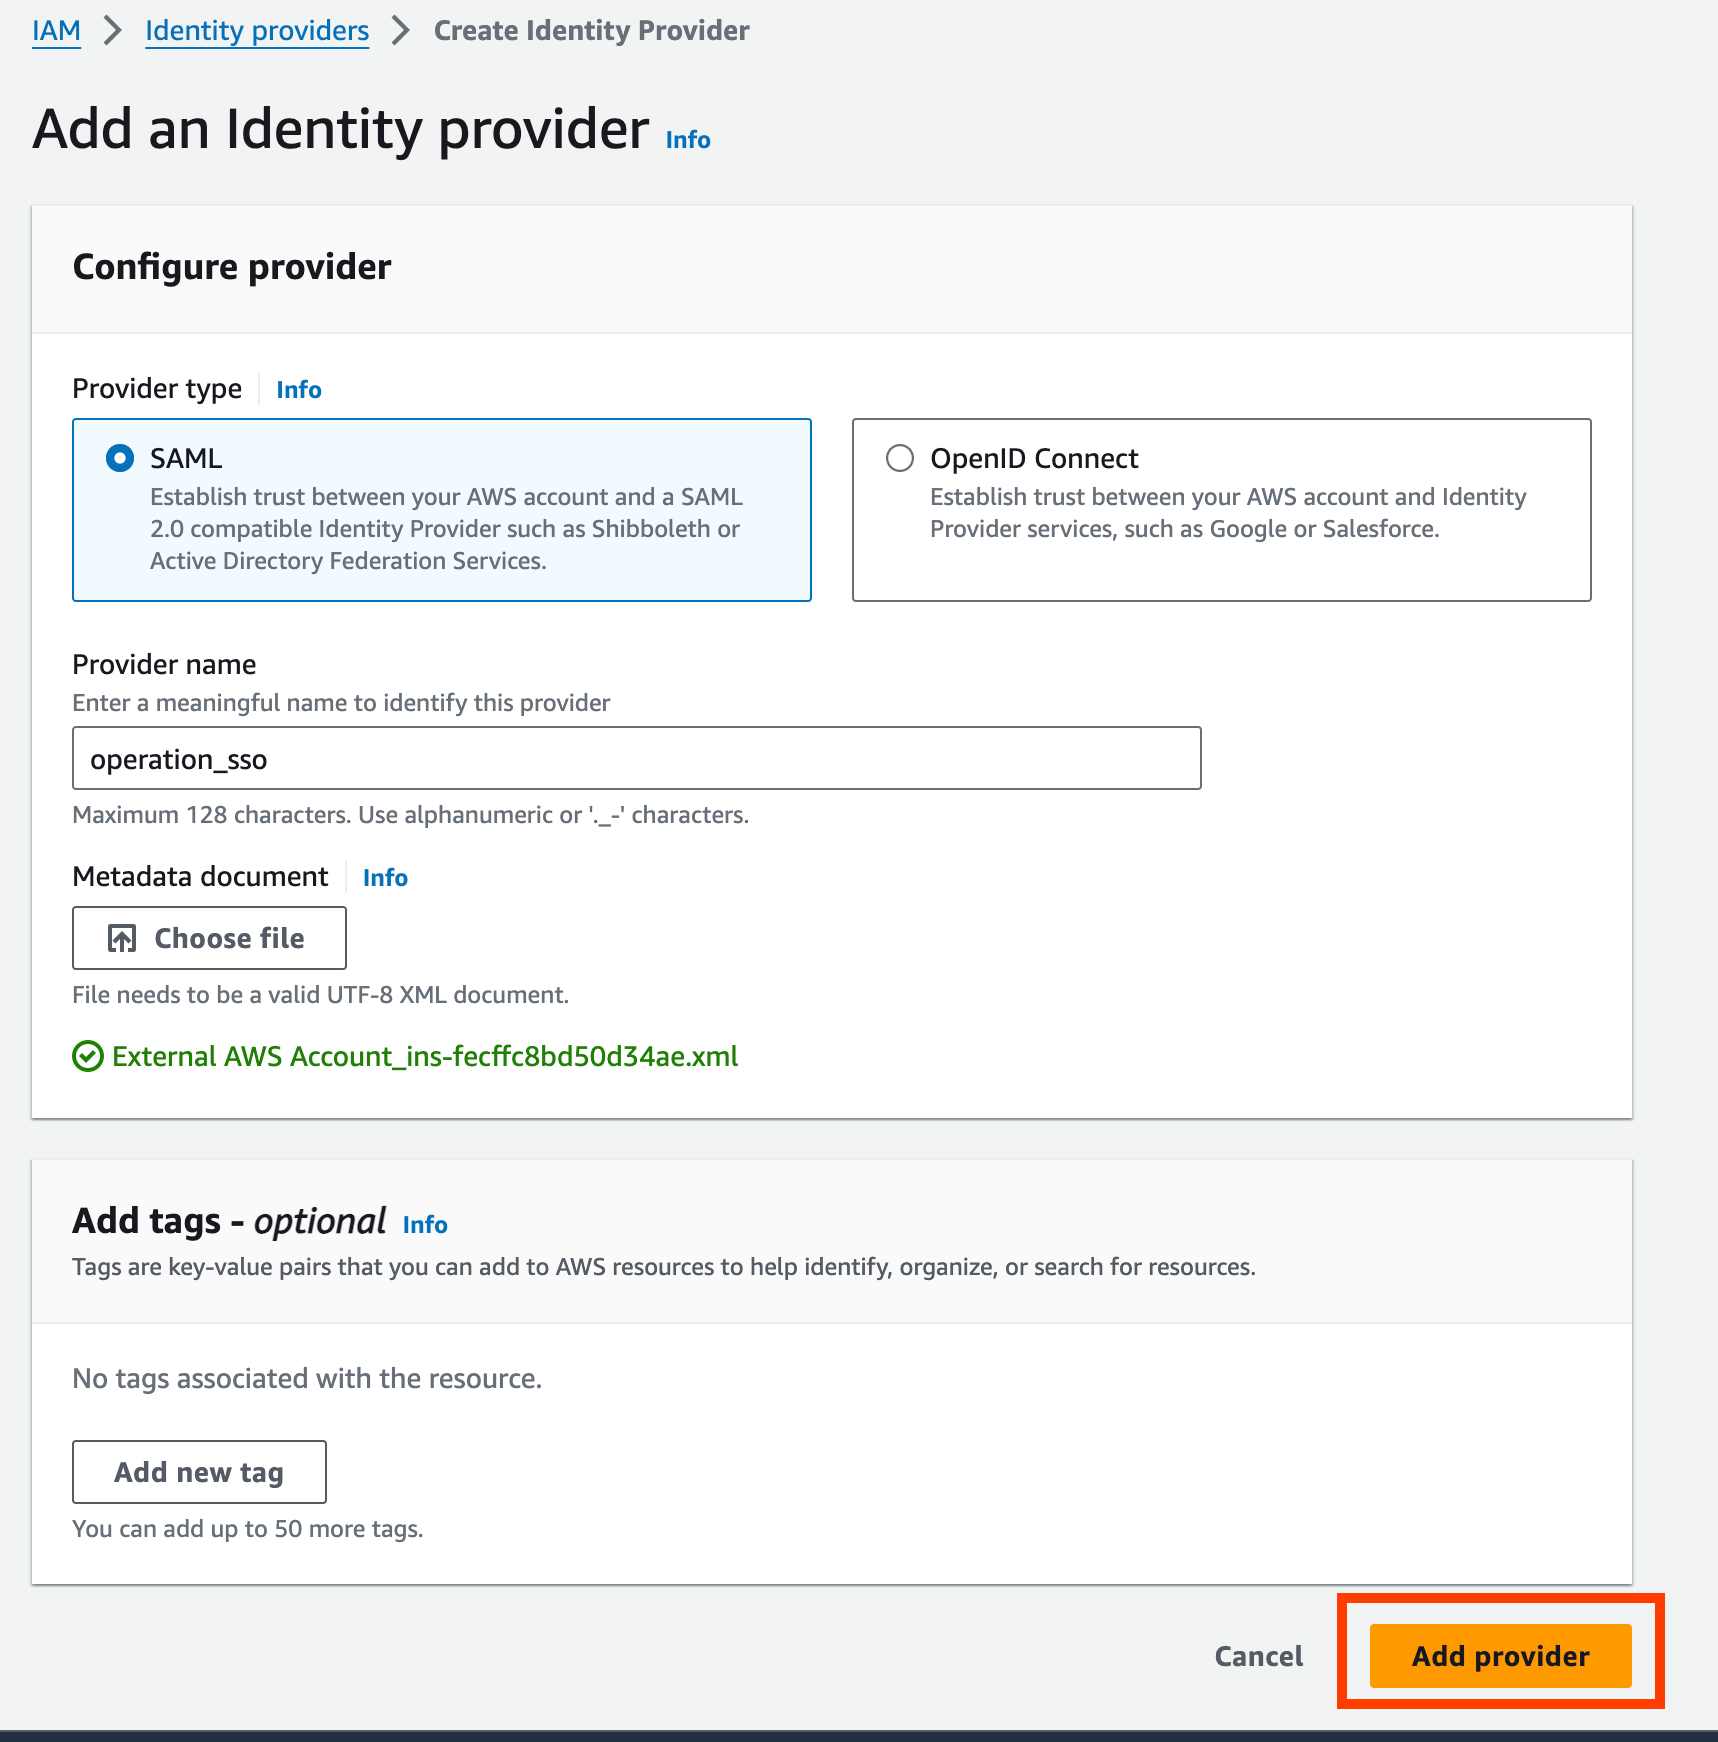
- In the “Add an Identity provider” window, select SAML, and enter the provider name. Take note of the provider name which will be needed in the Identity Center.
-
Upload the IAM Identity Center SAML metadata file that was downloaded earlier.
-
Select “Add provider”.
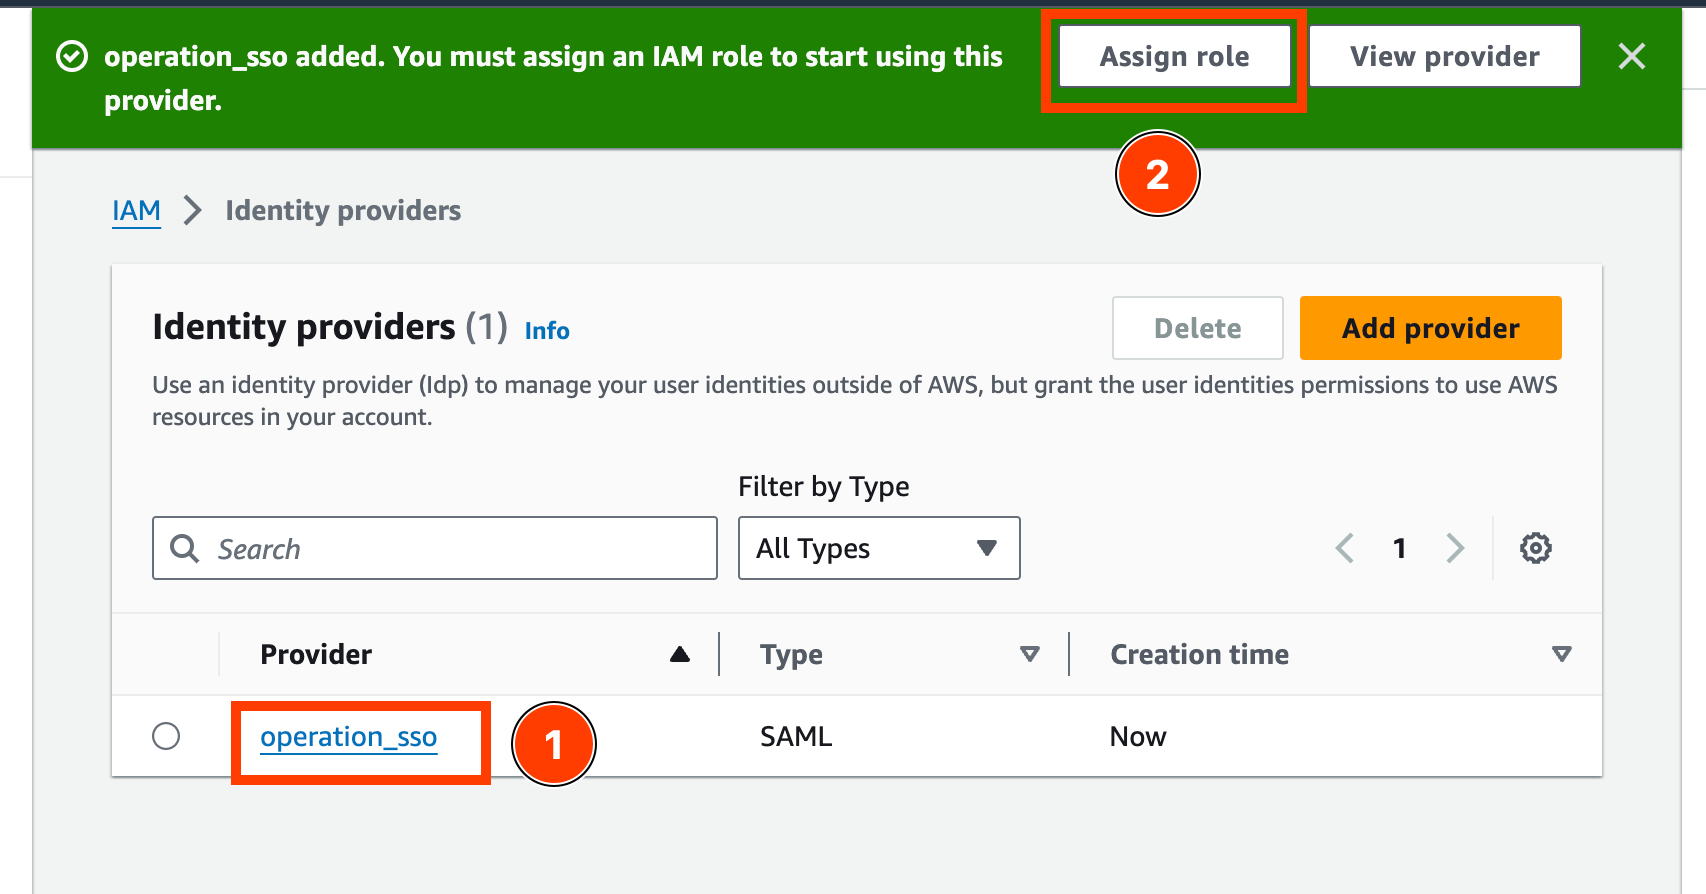
- Once the Identity Provider has been successfully created, it should be shown in the Identity providers. Select the “Assign role” to assign either a new role or existing role to this identity provider.
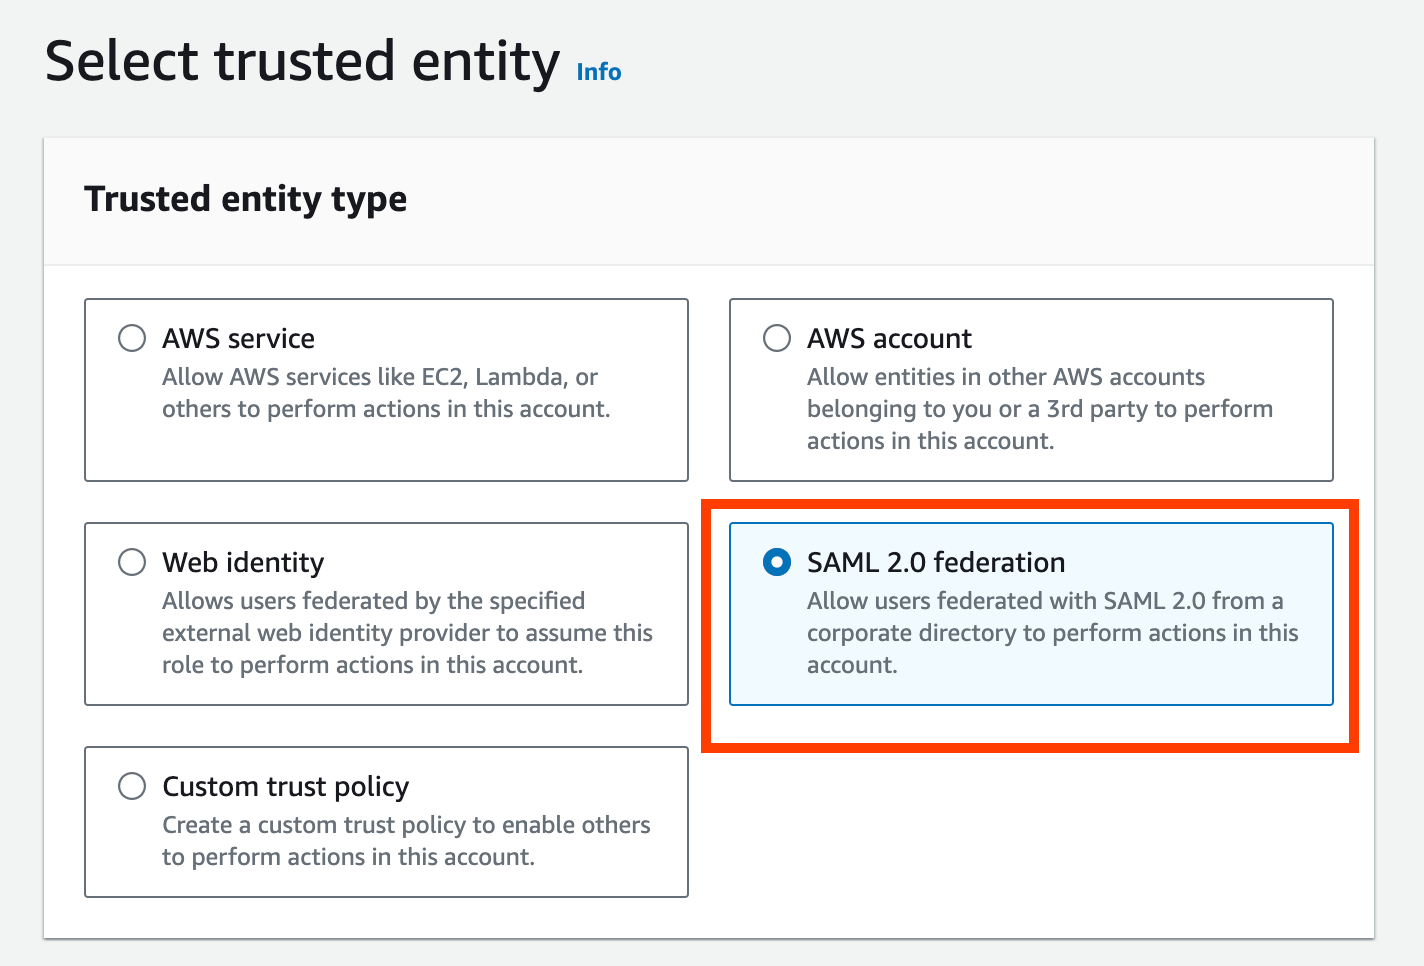
- If you select “Create new role”, the IAM role creation screen will automatically select “SAML 2.0 federation” with the Identity provider.
-
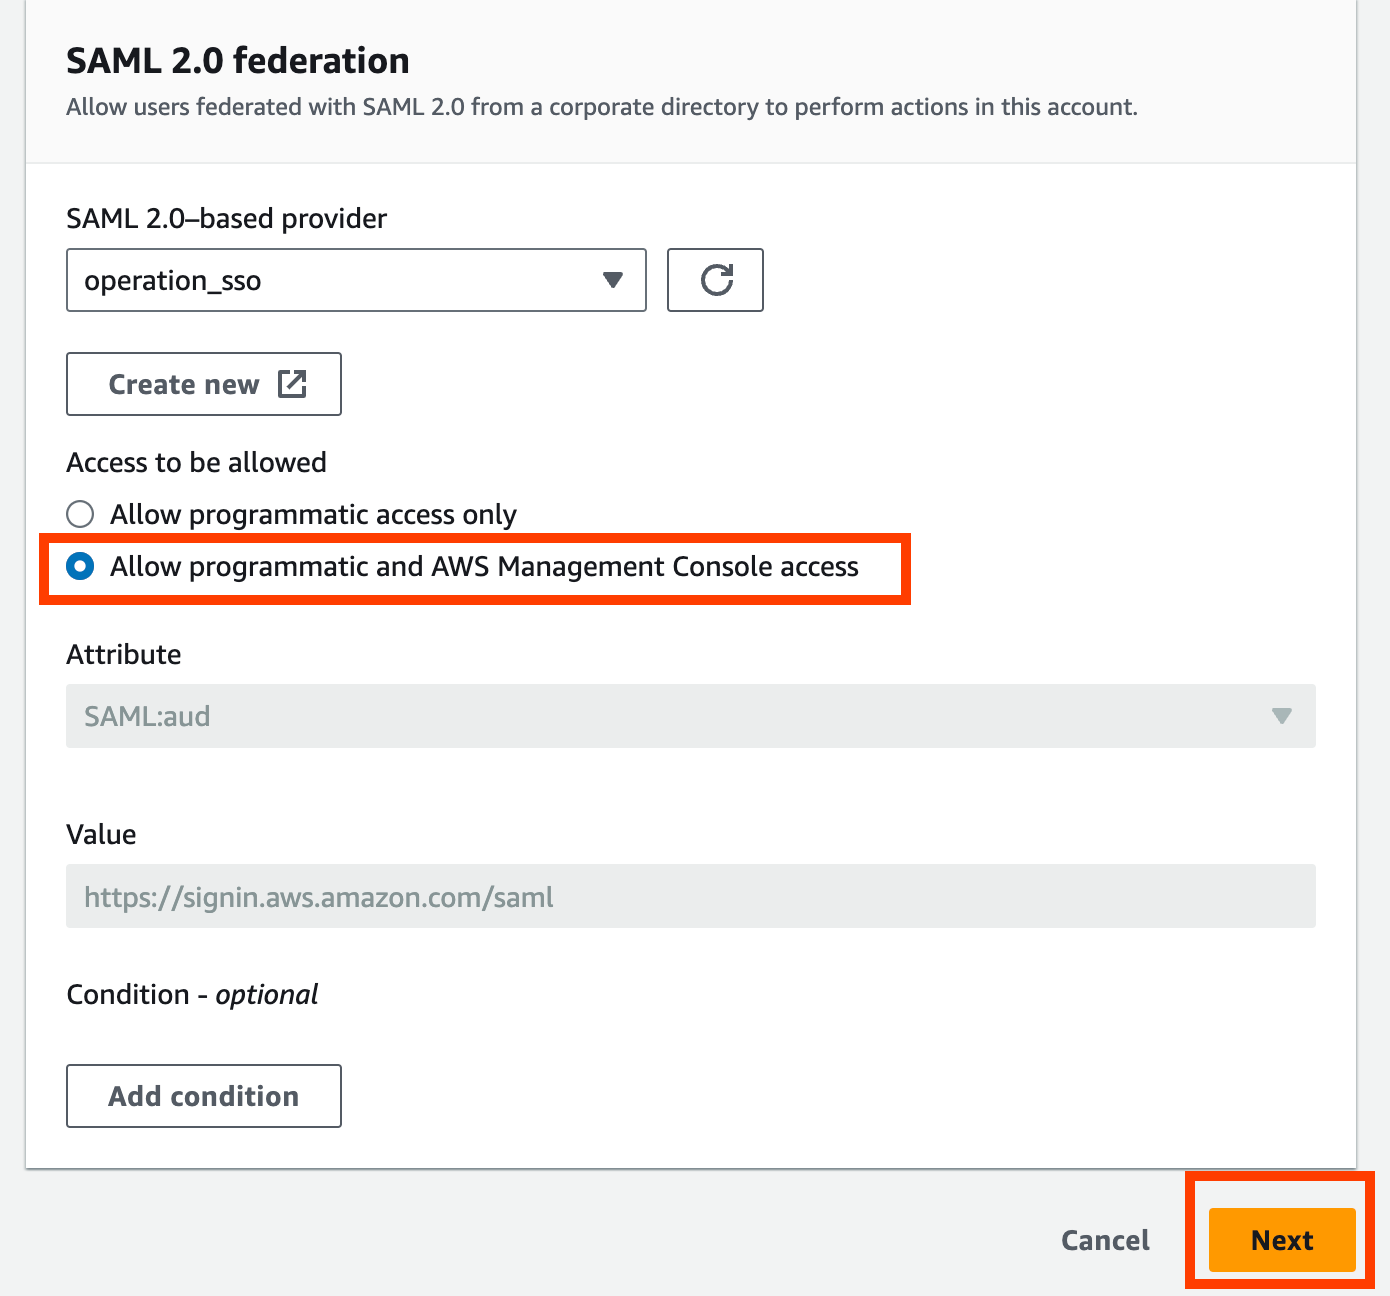
Select the access in the “Access to be allowed”.
-
If the access includes AWS Management Console access, the attribute will be pre-populated.
-
Attach the permission policies. It is recommended to adhere to the principle of least privilege (see AWS Well-Architected Framework).
-
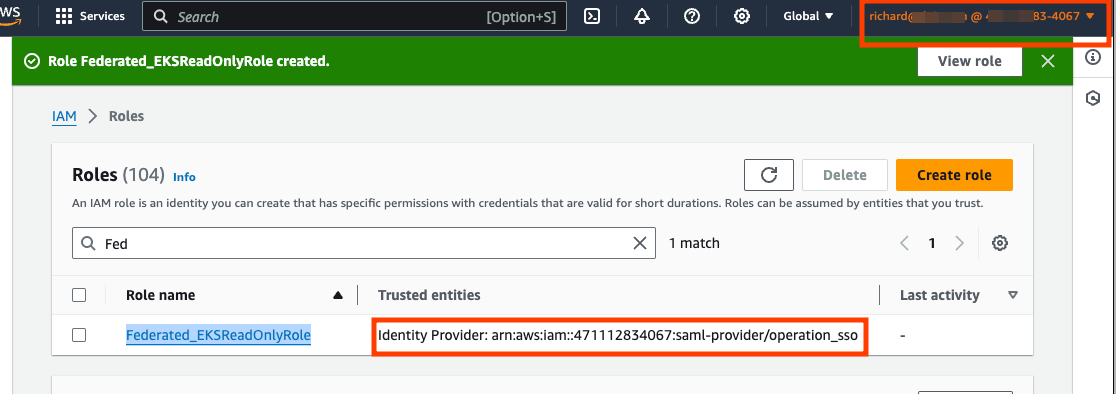
Give the role a name and description, and select “Create Role”.
-
Once the role is successfully created, the role should be shown in the Roles with Identity Provider as the Trusted entities.
Step 4: Configure access details of the IAM role in the Identity Center
Description: After setting up the external account and SAML provider, this step involves configuring attribute mappings in IAM Identity Center. These mappings define which roles in the external AWS account the users can assume and under what conditions.
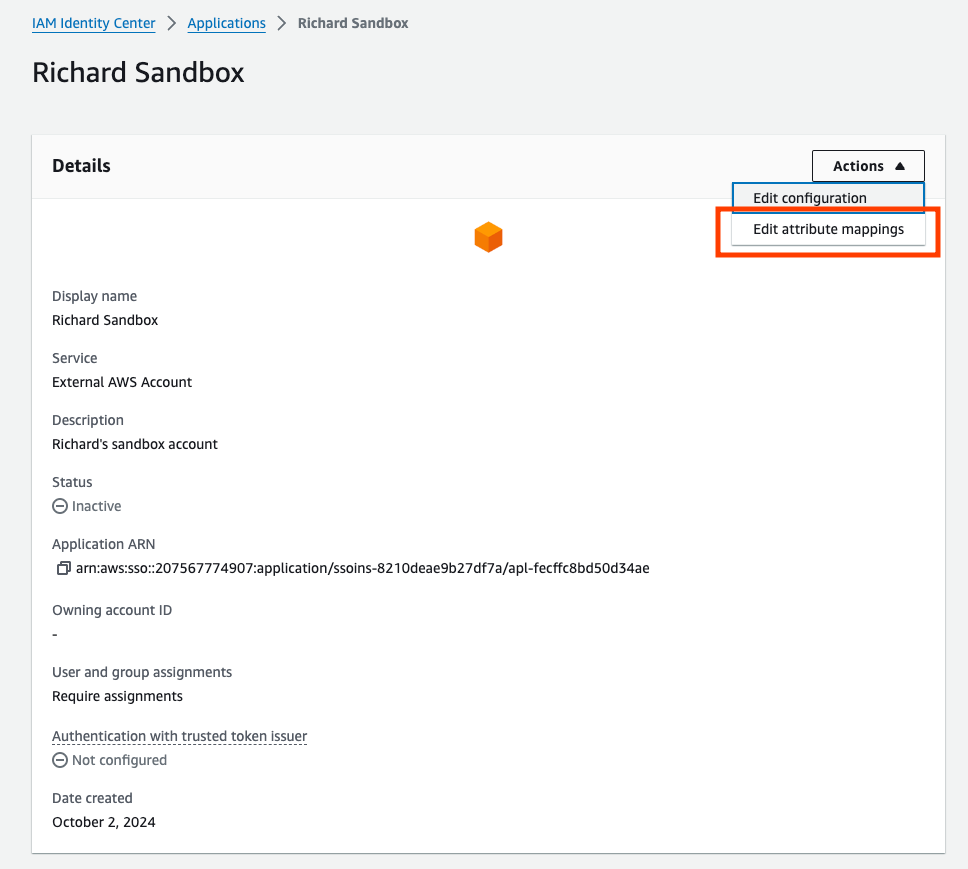
- On the AWS Identity Center console, select the external application created, and select “Edit attribute mappings”.
- Create 2 new attributes:
| Attribute name | Mapping |
|---|---|
| https://aws.amazon.com/SAML/Attributes/Role | arn:aws:iam::ACCOUNTID:saml-provider/SAMLPROVIDERNAME,arn:aws:iam::ACCOUNTID:role/ROLENAME |
| https://aws.amazon.com/SAML/Attributes/RoleSessionName | <ROLE_SESSION_NAME> must match [a-zA-Z_0-9+=,.@-]{2,64} |
Where:
ACCOUNTIDis the AWS Account ID of the external AWS accountSAMLPROVIDERNAMEis the name of the SAML Identity Provider created in the external AWS accountROLENAMEis the name of the IAM Role created in the external AWS account.
-
In this example, the mapping for
https://aws.amazon.com/SAML/Attributes/Rolewould be:arn:aws:iam::<External AWS Account>:saml-provider/operation_sso,arn:aws:iam::<External AWS Account>:role/Federated_EKSReadOnlyRole.
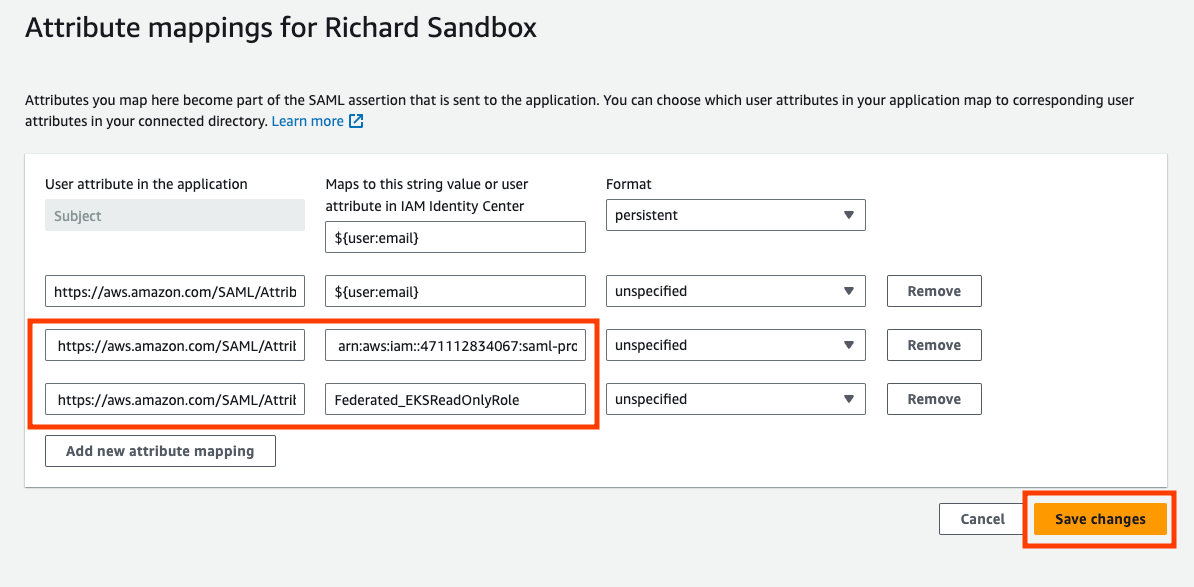
- Select “Save changes”.
Step 5: Assign users or user groups to the application
Description: In this step, you will assign individual users or groups from your IAM Identity Center directory to the external application. These users will then be able to use SSO to access the external AWS account.
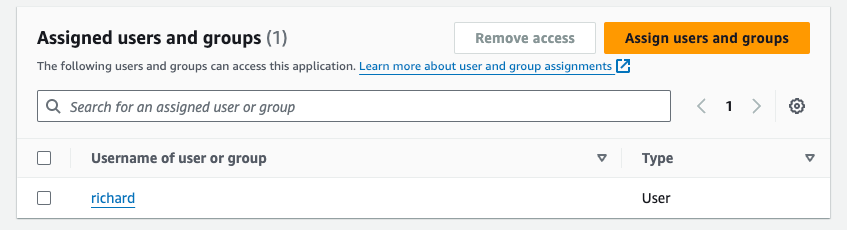
- Select “Assign users and groups”, add users or user groups accordingly.
Step 6: Verify
Description: The final step is to verify that the entire setup is working correctly by testing the SSO login and access to the external AWS account.
-
Go to the SSO login URL, which can be found in the Identity Center dashboard.
- Login using the user of Identity Center.
-
Upon successful login, the user should be able to see the application.
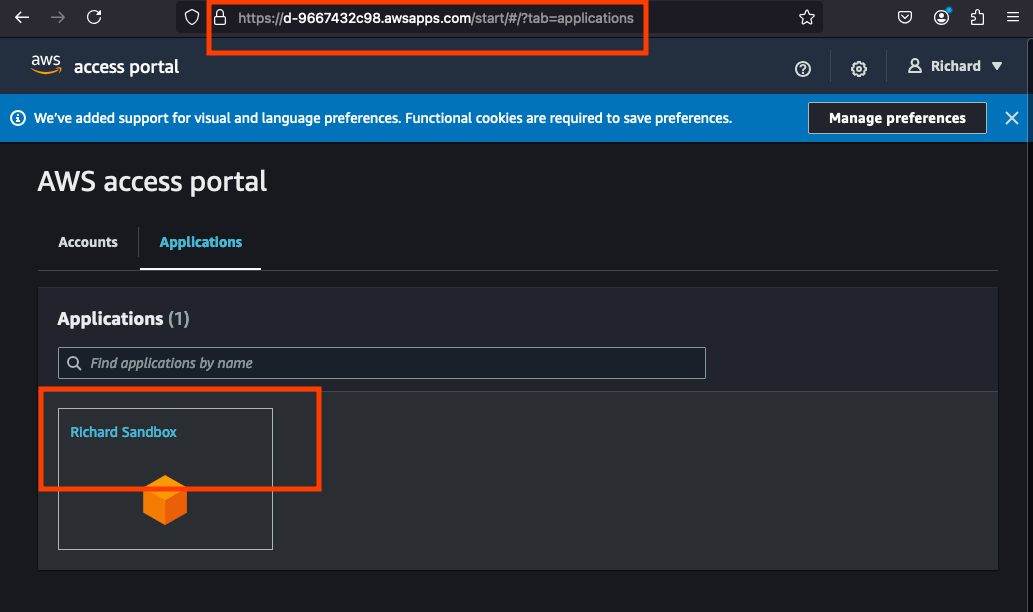
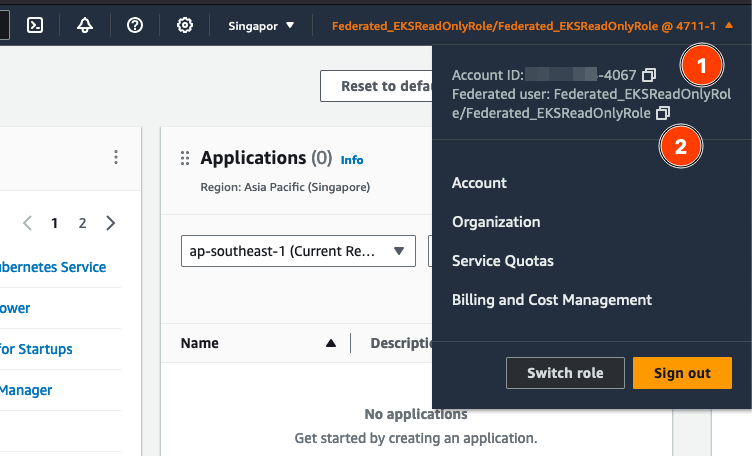
- Selecting the application will grant the user access to the external AWS account, showing the external AWS account and the role name mapped in the attribute.
Access keys from the SSO
Description:
- Open a terminal, and enter command
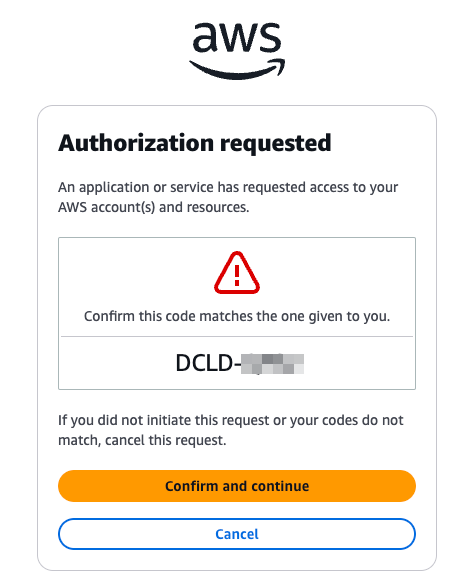
aws configure sso - Update the required parameters, such as
% aws configure sso SSO session name (Recommended): My-SSO SSO start URL [None]: https://<The SSO sign-in URL>.awsapps.com/start/#/ SSO region [None]: <Region of the IAM Identity Cener> SSO registration scopes [sso:account:access]: Attempting to automatically open the SSO authorization page in your default browser. If the browser does not open or you wish to use a different device to authorize this request, open the following URL: https://<The SSO sign-in URL>.awsapps.com/start/#/device Then enter the code: DCLD-#### - A browser will be opened up for you to login
- Once SSO has been configure,
The only AWS account available to you is: <AWS Accounts that granted access> Using the account ID <a default AWS account> The only role available to you is: AdministratorAccess Using the role name "AdministratorAccess" CLI default client Region [None]: CLI default output format [None]: CLI profile name [AdministratorAccess-<AWS Accounts that granted access>]: SSO-access To use this profile, specify the profile name using --profile, as shown: aws s3 ls --profile SSO-access - In subsequent session, login via SSO with the command
aws sso login --profile <SSO Profile>$ aws sso login --profile SSO-access Attempting to automatically open the SSO authorization page in your default browser. If the browser does not open or you wish to use a different device to authorize this request, open the following URL: https://<SSO URL>.awsapps.com/start/#/device Then enter the code: KPJX-####
Gets the IAM Role ARN to be used in EKS aws-auth
- If you need to add the full ARN to the aws-auth ConfigMap, first get the STS ARN, such as:
% aws sts get-caller-identity --profile SSO-access { "UserId": "<SSO User ID>", "Account": "<AWS Account ID>", "Arn": "arn:aws:sts::<AWS Account ID>:assumed-role/<AWS IAM Role ARN>/<SSO User ID>" } aws-authrequires the IAM role arn, which can be obtain by removing the path:% echo "arn:aws:iam::$(aws sts get-caller-identity --query Account --output text --profile SSO-access):role/$(aws sts get-caller-identity --query Arn --output text --profile SSO-access | cut -d/ -f2)" arn:aws:iam::<AWS Account ID>:role/<AWS IAM Role ARN>